A Fuel Meter From A Disposable Butane Lighter
Here is a way to make a fueling meter for a combustion spudgun from a cheap disposable butane lighter, some insulated wire and a syringe. For less then $10 you can build a meter system that is simpler and more accurate than a meter built with a propane tank, piping, valves and a regulator. Of course, this system doesn't have nearly the "bling factor" of a well done traditional propane meter (like BurntLatke's beautiful meter). But it is simple, cheap and accurate.
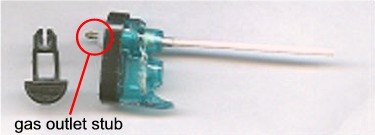
Below is a picture of a disassembled disposable butane lighter. To use an intact lighter as a fuel source we need to be able to use the gas outlet nozzle ("gas outlet stub" in the picture) as a hose barb. According to my micrometer, the nozzle's OD is 0.069". Where can we get a suitable piece of hose with an ID this small? There is certainly places where small ID hose can be purchased (such as McMaster-Carr) but I wanted to avoid spending much time or money on this meter.
My first thought was that I might be able to use the dip tube from another lighter as the small ID hose. Unfortunately, the dip tube (the white tube in the picture above) is not a tube at all. Instead it is some type of porous foam rubber.
After a couple of months of cogitation, I realized that I have several types of small ID hose in my junk boxes. The insulation sheath of various gauges of electrical wire have IDs in the range of the lighter's nozzle. If you pull the insulation off a hunk of wire you have a small ID hose that can be slipped over the lighter's nozzle.
Your local gas station sells disposable butane lighters for 99¢. Go on down and buy a couple. For your buck you get about 6cc of butane in a suitable container along with the valve we need. These cheap lighter as not very consistent. Some will barely light, others work like a blow torch and give a two inch flame. Try to get a lighter that produces a flame an inch or more long.
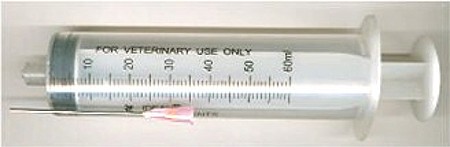
Next, go to a farm supply store (in the midwest try Tractor Supply Company) and get a 60cc (or larger) "Luer Lock" (or just "Luer") syringe used to give shots to livestock. The syringe will cost a buck or two. Also get a couple of syringe needles. You should be able to get two needles for about a buck. I use 18 gauge, 2" long blunt tip, Luer Lock needles but 16G and 20G should work as well. An 18G needle has an OD of 0.047". Get blunt tip needles if you can since you don't need a sharp needle and syringe needles are very sharp. (Syringes and needles are also available from McMaster-Carr and 50cc syringes for $1.20 each from here.) You probably need a syringe that is at least 50cc, and 60cc is the largest I have ever seen at farm and veterinary supply stores.
The last thing you need is an inch or two of hose with ID less than the 0.069" (~1/14") OD of the lighter nozzle. This is the tricky part. McMasterCarr and other suppliers probably have the tubing needed but I used a different source. RadioShack sells a spool of "20G Test Probe Wire" (part #278-563, 20 feet for $5.00). The insulation of this wire is very thick, flexible and exactly the ID we need. (This wire is also excellent for wiring your ignition sparker, it is flexible and the extra thick insulation is rated to 1000 volts. So the other 19'-10" of wire on the spool can be used for other things.) The OD of 20G wire, which is equal to the ID of the insulation, is 0.032". The insulation stretches enough so that the 0.069" OD fuel nozzle can be pushed into the 0.032" ID tube (after removing the copper wire).
If you can't get the test probe wire you can use the table below to help find a suitable gauge wire to use instead.
| Wire Gauge (G) | Wire OD = Insulation ID (inch) |
|---|---|
| 20 | 0.032 |
| 18 | 0.040 |
| 16 | 0.051 |
| 14 | 0.064 |
| Lighter Nozzle | 0.069 |
Assembly of the meter is simple and is described in the image below.
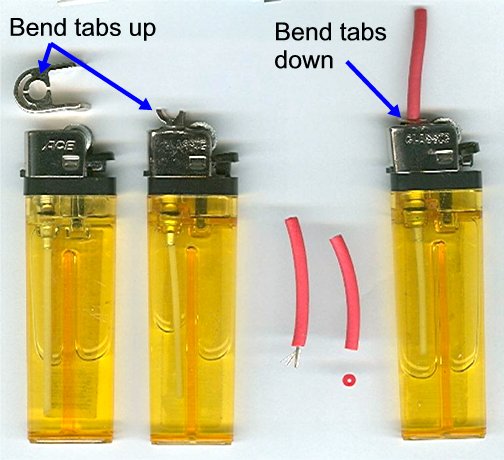
The lighter on the left is unmodified. Above it is the metal shroud from another lighter showing what the top of the lighter looks like. Do not remove the metal shroud from your lighter.
1. Using a pair of needle nose pliers bend the circular "tabs" on the top of the lighter up, as shown on the second lighter, so that you can get to the gas outlet nozzle.
2. Take a piece of wire a couple inches long and strip a bit of the insulation off one end. Pull the wire out of the rest of the insulation. For stranded wire it is easiest to first pull out a couple strands to loosen things up and then pull out the remainder of the strands. For solid wire, you may have to work at it to get the copper out of the insulation without damaging the insulation. A small piece of the insulation is shown in the photo above to show how thick the insulation is on the probe wire I use.
3. Now comes the hard part. You need to slip the tubing over the fuel outlet nozzle of the lighter. It helps if you use a bit of saliva on the end of the tube as a lubricant. Align the bore of the tubing with the nozzle as best you can and push and twist the tubing to get it over the nozzle. It may take a couple of tries to get the tubing on. A pair of needle nose pliers might help. Once the tubing is in place be careful with the assembly since the fuel nozzle is short and the tubing doesn't hold on to it very well.
4. Take your needle nose pliers and bend the curved tabs back into place. Then use the pliers to crush the top of lighter so that the tabs grab the plastic tubing to hold it in place. Don't crush the tubing too much or it will collapse. Don't crush the metal shroud too much or it will fall off the lighter. If the metal shroud falls off the lighter it won't leak. You can discard the striker wheel, flint and spring and reinstall the shroud.
5. Insert the needle, lubricated with saliva, into the end of the tubing then screw the syringe on the needle.
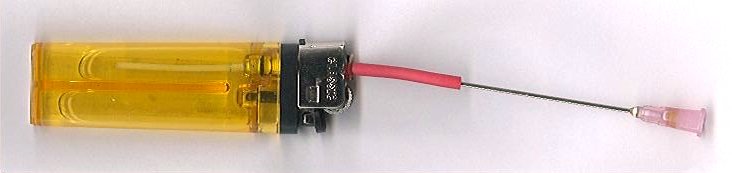
Ta da! You have a fuel source and highly accurate meter for a couple of bucks.
To use the meter just push the valve lever on the lighter. The syringe plunger will slowly move back as the syringe fills with butane. It takes 10 or 20 seconds to get 50cc out of the lighter. You can help things along by gently pulling back on the syringe plunger as it fills to help overcome the fairly high friction between the plunger and syringe body.
Once the syringe is filled with the proper amount of butane grasp the tubing and the needle and pull the needle out of the tubing. Be careful, it is easy to pull the tubing off the gas outlet nozzle instead of pulling the needle out of the tubing. As soon as the needle releases from the tubing put your finger over the end of the needle to keep the butane from escaping. (This is why I prefer a blunt needle over a sharp one!) The lighter will pressurize the butane in the syringe to about the same pressure as in the lighter, roughly 2 ATM at 70F. In the second or two the needle was open after pulling it out of the tubing the pressure in the syringe will have equalized to atmospheric pressure.
Open the clean out plug of your spud gun, insert the syringe needle then close off the opening with the clean out plug leaving only enough room for the syringe needle. Squirt in the butane and immediately screw the clean out plug onto the gun.
Slowly invert the gun a few times to get the butane, which is heavier than air, to mix completely with the air in the chamber. Better yet, install a chamber fan to mix the butane.
The chemical equation for the complete combustion of butane is;
2C4H10 + 13O2 = 8CO2 + 10H2O + heat (2,800 kJ/mol)
For complete combustion we need 13 volumes of oxygen (O2) for 2 volumes of butane (C4H10). Since air is 20.9% oxygen we can calculate the volume percent of butane needed for complete combustion in air using;
(20.9%)(2/13) = 3.2%
For every 100in3 of chamber volume we need 3.2in3 of butane (1in3 = 16.4cc).
If we were using propane;
C3H8 + 5O2 = 3CO2 + 4H2O + heat (2,219 kJ/mol)
For complete combustion we need 5 volumes of oxygen (O2) for 1 volume of propane (C3H8).
(20.9%)(1/5) = 4.2%
We can calculate the relative energy for propane versus butane using the heats of combustion and volume ratios (which are the same as the mole ratios) of fuel to oxygen;
|
=
|
0.97 | ||||||||||
|
|
||||||||||||
|
So there is a 3% difference in energy between propane and butane, with propane being the more powerful.
I measured the internal volume of this type of lighter and it contains about 0.35in3 (5.7cm3) of butane. The density of liquid butane is 0.58g/cm3, so these lighters contain ~3.3 grams (0.057 mole) butane. 0.057 mole of a gas at STP is equivalent to 1.3 liters of gas. A combustion gun with a 3"D x 12"L chamber needs 2.7in3 (44cm3) butane for a 3.2% mixture. Therefore, this size lighter, for this size gun, contains about;
(1.3L / 44cm3) * (1000cm3/L) = 30 shots
The boiling point of butane is 33F (0.5C), which is much higher than the boiling point of propane (-44F, -42C). As a result, the vapor pressure in a butane lighter is much lower than in a propane tank. The graph below shows the vapor pressure of butane as a function of temperature.
At 70F a butane lighter is pressurized to a little over 2 ATM. Near 30F the pressure is only about one ATM, so a butane lighter will be difficult to use at low temperatures. This is not a limitation since it is not a good idea to be using a PVC based spud gun at temperatures in the 30's anyway.
At temperatures above 120F these cheap butane lighters can explode. At 140F the pressure in the lighter is 7 ATM. When they explode there isn't any flame (usually), just a pressure induced failure of the plastic lighter body. I've had a couple of these lighters explode in my car on hot days. No damage to anything, except the lighter of course, but shards of plastic are well distributed about the car's interior.
Below is a picture of all the parts of a typical $0.99 butane lighter.
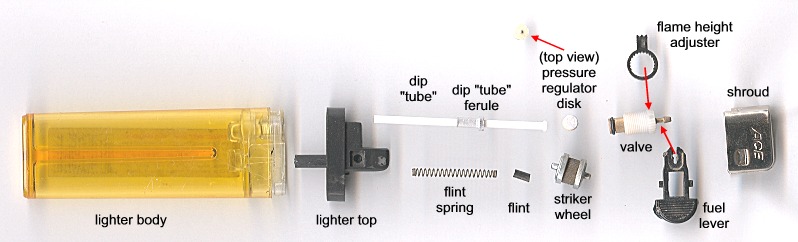
The fuel valve is opened when the fuel lever lifts the fuel nozzle relative to the white valve body. There does not appear to be any pressure or flow rate regulation done by the valve itself. Instead, pressure and flow rate regulation appears to be done by the bottom of the valve being screwed down on to the pressure regulator disk. The pressure regulator disk's metal bottom is then pressed down on to the top of the dip "tube" and the dip "tube" ferrule. (The dip "tube" isn't a tube at all but a rod of porous plastic.) It appears that the combination of the bottom of the valve, the pressure regulator disk and the top of the dip "tube" ferrule constitutes the outlet pressure regulator. It is this that regulates the flow rate and controls the flame height.
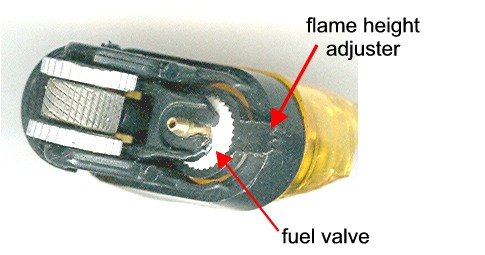
The flame height is adjusted using the flame height adjuster lever. This lever has inner teeth that engage the outer teeth of the valve. Moving the lever from side to side screws the valve in and out of the lighter body by just a small fraction of a turn.
A lighter that produces a ~1" flame will deliver about 1cc/second into a syringe. Below is a mod that can get the flow rate up 5cc/second or more.
It is possible to change the factory set range of the flame height adjustment. If you slip a small flat blade screwdriver between the metal shroud and the black plastic tower that holds the striker wheel axle you can pop the shroud off the lighter. To increase the flame height follow these steps.
With this mod you can get a lighter to deliver 5cc/second or more. The lighter may no longer light with the flint since the gas flow rate is too high and there isn't enough oxygen in the vicinity of the spark. If you light the modified lighter with something else, it will have a flame that is 12 inches long or more. The actual flame height will depend on how many turns you took out of the fuel valve and the ambient temperature.
It might be a good idea to mark any lighter you've modified since 12 inch flame is surprising if you were only expecting a half-inch one. You don't want anyone lighting there head on fire by accident.
Send
me an email
Modified: 25 September 2006
©2006 James Sluka